
What is the purpose of a virtual PBX?
When a company has more than one employee and needs to manage business communications, a virtual PBX becomes essential. A free virtual PBX enables the connection of virtual numbers in different countries and cities, making it easier to interact with customers by directing calls to the right person.
Some of the key features of a virtual PBX include:
- Call recording and analysis: Useful tools for monitoring sales representatives and evaluating conversations.
- Call forwarding, voicemail, and missed call notifications: Ensure that no important calls are lost.
- Voice menus and business hours settings: Enhance professionalism and streamline operations.
- Integration with popular CRM systems and a free built-in CRM: Allows all customer interactions to be recorded in one place.
- Voice recognition and analysis: Facilitate call monitoring and employee performance evaluation without the need to manually listen to call recordings.
How to set up a Virtual PBX? configuration assistant.
The configuration assistant simplifies the initial setup process. The first step is simply clicking the “Create PBX” button in your personal account.
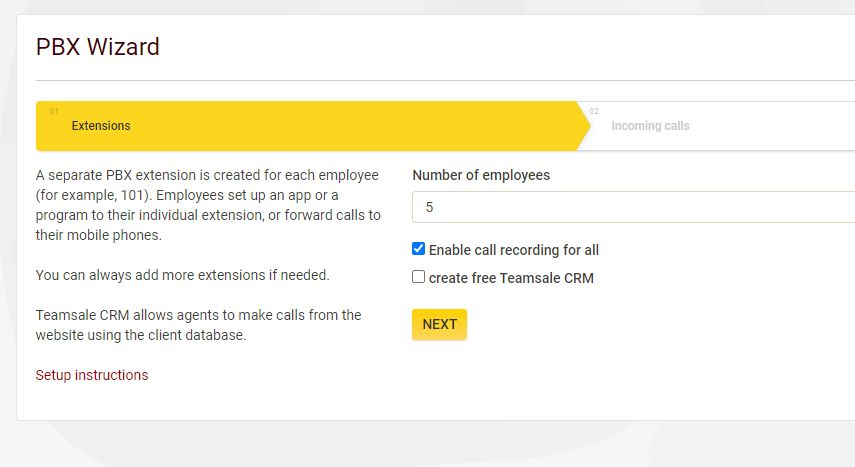
The configuration assistant consists of just two steps:
- Choose the number of extensions (employees).
- Select the scenario, meaning what the customer will hear when calling.
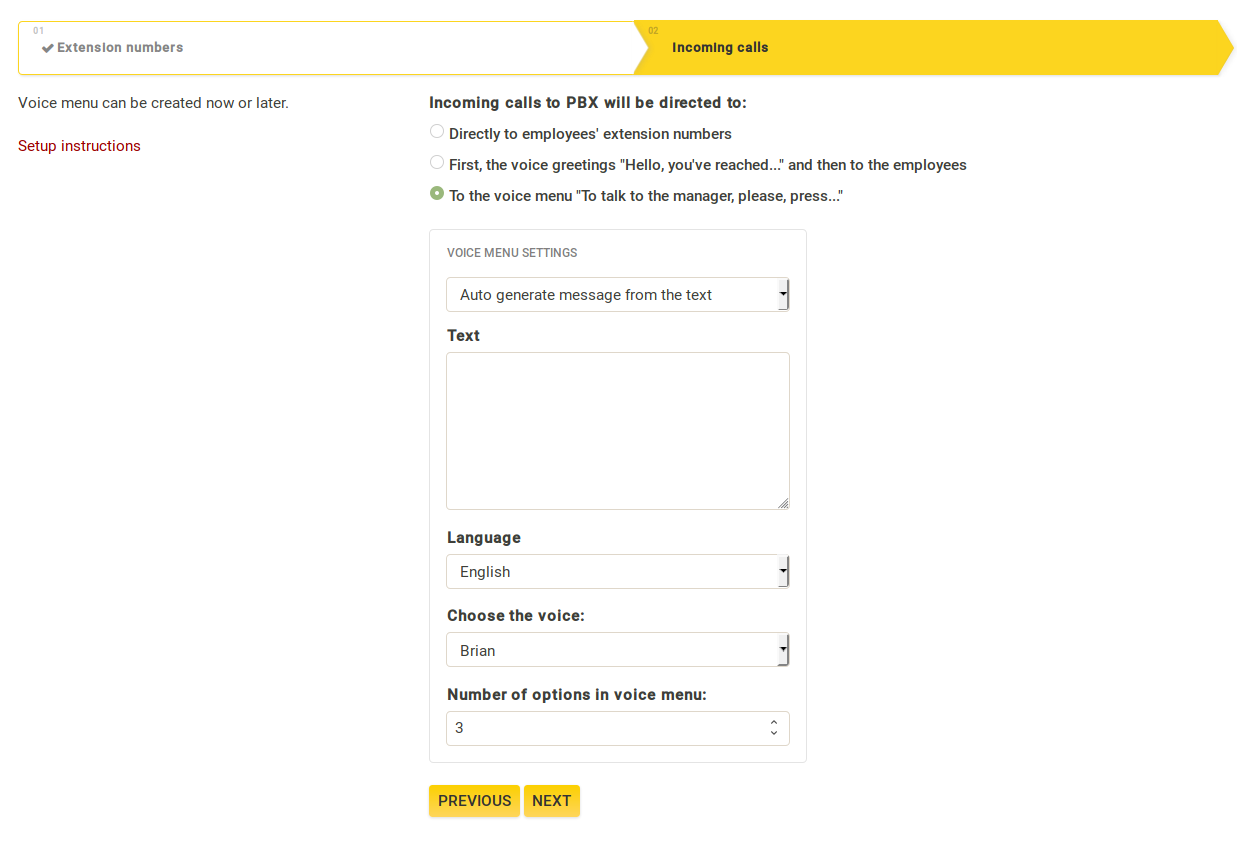
And that’s it! The basic setup is complete, and this will likely cover your essential needs. However, we recommend exploring the configuration of other PBX features, as making full use of them can greatly enhance call management. Features like call queues, an after-hours auto attendant, and missed call notifications via messages can make a big difference.
Next, let’s move on to setting up devices and software for making calls.
Downloading and installing Apps on your computer or phone.
Congratulations! If you’ve made it this far, it means the basic setup of your virtual PBX is complete. Now, it’s time to decide how employees will receive calls.
If Megacall CRM is activated and you want to receive calls via your browser, you can skip this step. You can also make calls directly from Chrome using a Google Chrome extension.
We recommend using our official Megacall app for Windows, iOS, and Android.
- Setting up devices or apps: From your personal area, go to “My PBX” – “Extensions” to find details such as the server, username, and password for each extension. Each app or device should have its own extension with a unique username and password. If you need more extensions, you can add them from the same page.
- Additionally, you can receive calls on another mobile or landline number using the call forwarding service. Keep in mind that call forwarding is a paid service and is billed as an outgoing call to the forwarded number.
Virtual number connection.
Now that you’ve linked the software, you’re ready to receive incoming calls from your customers. To do this, you’ll need to connect a virtual phone number. You can choose one or multiple numbers from over 100 countries in the virtual numbers section within settings in your personal area.
If you already have a number from another provider, you can link it to the virtual PBX in the “External Lines” section. Detailed instructions are provided later.
Congratulations! You can now start using the PBX, and if desired, configure additional features.
Incoming calls and voice menu setup
With the basic settings, you can already receive and make calls. But now, let’s take a closer look at other useful settings for incoming calls.
Menu items and calling sequence.
The menu items, also known as scenarios, are groups of extensions that will receive the call when the specific condition previously selected is met, such as pressing button 1 in the voice menu or calling from a number in a specific city.
In the “My PBX” – “Incoming Calls and Voice Menu” section, you can write, add, or delete scenarios according to your needs.
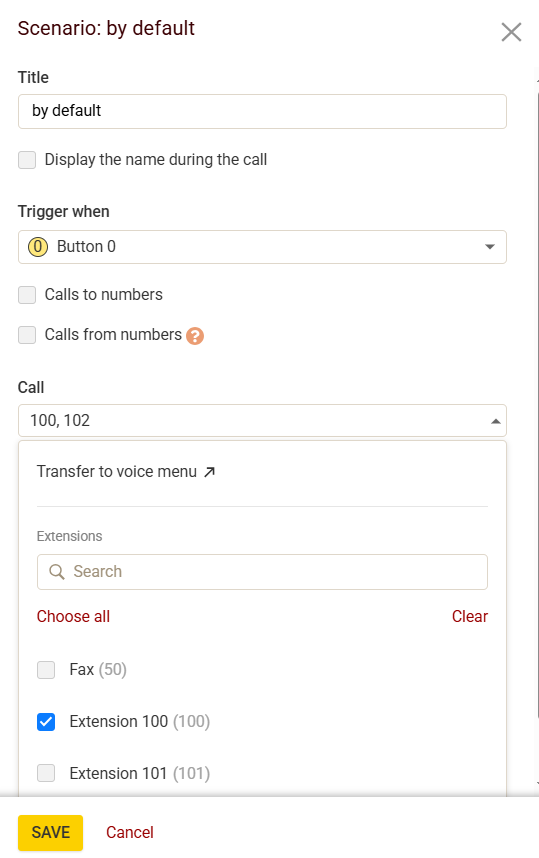
To add a scenario, click the “+Scenario” button. In the right side block, you will find the scenario settings menu.
- Name: The name that will appear in the scenarios list of your personal account.
- Trigger when: Select the button that will activate the scenario. This can be triggered not only by pressing a button in the greeting but also by calling from specific numbers or prefixes (e.g., +3491*) or by calling one of your Megacall numbers.
- Call group: Choose the employees (extensions) who will be able to answer the call. You can select an existing one or create a new group.
- Go to menu: Select the IVR menu for the next action (for multi-level IVR configuration).
Once you have selected the “Trigger when” button and created or selected the call group, a link will appear for configuring the incoming call.
Calling setting: Choosing the algorithm for distributing incoming calls among employees
In the “Calling settings” section, you can adjust the call strategy to fit your needs, including the waiting melody, call duration (indicating when it should end), the action in case of no response, and activating the notification for the queue number to distribute calls either evenly or randomly.
Strategies for call distribution among PBX extensions:
- Equally: Calls are distributed fairly based on the time of the last call on the extension or the total number of calls received. You can enable customer notifications to inform them of their position in the queue.
- Manually: This is the default option, allowing you to configure the order manually using a slider. For example, a 2-minute call first rings on extensions 100 and 101, and after 60 seconds, it moves to extensions 102 and 103.
- Simultaneously: All extensions in the call group receive the call at the same time.
- In sequence, from top to bottom: Incoming calls are distributed in order, from top to bottom, based on how employees/extensions were added.
- Randomly: Incoming calls are distributed randomly among all employees. Like the even distribution method, this option includes a notification feature for queue order.
Important! The random and equal distribution methods are not compatible with call forwarding. This means that all selected extensions receive calls without considering forwarding settings.
Call Settings
Within the “Call Settings” section, you can configure the waiting melody, call duration (defining when it should end if not answered), and the actions to take in case of no response (hang up, retry, or direct to the IVR menu).
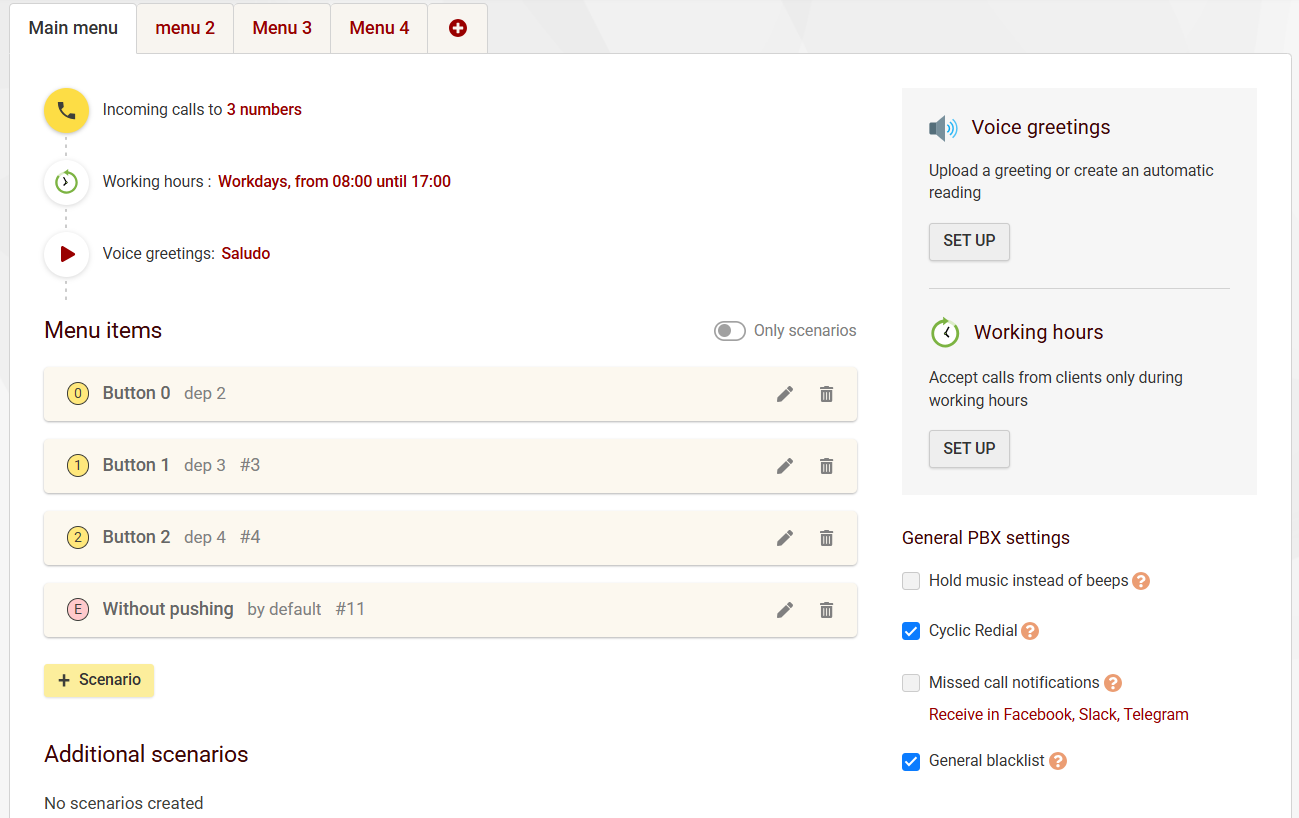
Voice menu, voice greeting, multiple voice menus
To add a greeting file, select the “Set up” button in the “Voice greetings” section.
You can upload a file or insert text that will be played by a voice system. For the inserted text, more than 15 languages and over 100 voices are available. This file can be used as a greeting, IVR menu (even for level 2 or higher), or as a waiting melody instead of standard tones.
If you need a different IVR greeting for each of your virtual numbers or a specific greeting based on business hours, go to “My PBX” – “Incoming Calls and IVR”, add a new menu (by clicking the “+” button), enable the “Activate for calls to this number” option, and select the number to which it applies.
Multilevel voice menu
In the latest version of the virtual PBX, it is possible to create multiple levels in the IVR menu.
- First, add the IVR files in the “Voice Greetings” block.
- Create all the necessary menus, including level 2 and higher, by pressing the “+” button next to “Main Menu.”
- In any element of the main menu (scenarios), select the option to route the call to the corresponding menu.
Call reception by a number being called
If you have multiple Megacall phone numbers, you can route each number to:
- Specific employee(s): In the “Additional Scenarios” section, click “+Scenario” and then “Call employees” In the pop-up window, select the phone numbers (calls to numbers) and the extensions (Call field) users who will answer the calls. Calls to the call group can be received simultaneously, in order, or according to a manual configuration.
- Department (IVR Menu):
- Create a new IVR menu (click “+” next to “Main Menu”) and proceed with the configuration (including the greeting and menu elements).
- In the new menu, select “Trigger when” and “+ Add triggers” There, choose “Calls to numbers” and specify the phone numbers to which the menu will apply.
Call reception by caller’s number
If you need to route calls from a specific customer to a particular salesperson, you can add an additional scenario for this purpose. Activate the “Activate for calls from specific numbers” option, enter the customer’s number in international format, and click “Add.”
This way, you can also set a mask based on country and city/operator prefix, for example, 3491*, to distribute calls to different agents depending on the caller’s province.
Calls from the specified numbers will be directed to the assigned extensions in this scenario, bypassing the IVR greeting.
Blacklist
From the “My PBX – Incoming Calls and IVR” section, you can configure the Blacklist.
To do this, click on the “Blacklist” button and add the numbers from which you do not want to receive calls. You can also set a number mask starting with the country, city, or operator prefix (e.g., 3491123* or prefix 44*).
Working hours and autoresponder features.
If you want to receive calls only during working hours, you must activate the “Working Hours” option in the “My PBX – Incoming Calls and IVR” section. Once inside, specify the working hours and the corresponding days.
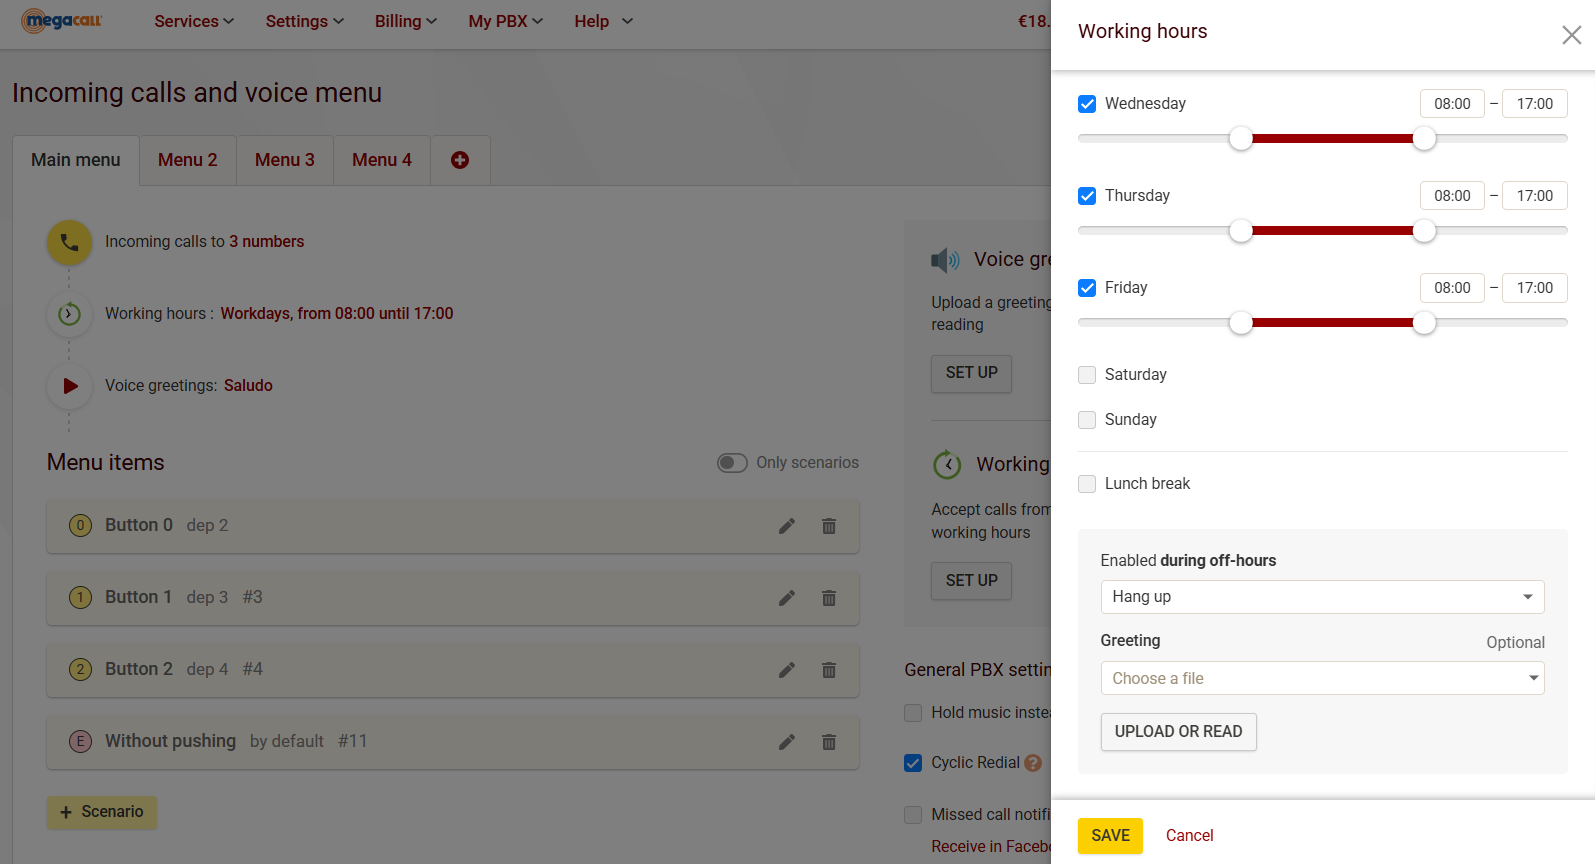
From this section, you can also set up a “siesta” schedule and public holidays. In the holidays section, you will find a list of national holidays from various countries, where you can add or remove days from the selected calendar.
Calls received outside working hours can be directed to a specific scenario, either to a particular employee or to voicemail. This way, the caller can leave a voice message, ensuring no information is lost. To achieve this, you need to add an additional scenario called “Voicemail” from the same “working hours” section.

To set up the voicemail, you need to forward calls to an extension or extensions where call forwarding to voicemail has been enabled. This forwarding configuration for each extension is done in the “My PBX – Extensions” section.
Visual virtual PBX editor
With the visual editor of the PBX, you can graphically view and understand how the virtual PBX is functioning and under which conditions different scenarios are applied. In this section, you can not only observe its operation but also configure the PBX using block diagrams.

To access the visual PBX configuration editor, use the “Open Editor” button in the “My PBX – Incoming Calls and Voice Menu” section. Here, you can visualize the call routing of your PBX. You can add any block from the left side to the diagram and configure the relationships between the blocks.
It is important to always check that it works correctly. To do so, click on the “Test” button. If everything is correct, click “Publish” to save all the configurations made.
Important conditions for using the PBX editor:
- The “Working Hours” block is added before the menu, so the “Yes” branch can only be connected to the menu, and the “No” branch can be connected to “Call Users”, “Audio File”, “IVR Menu”, and “Working Hours”.
- If no one in the Call Group has answered, it is indicated in the connection with the “Call Users” block that can be linked to the same block (call repeat action) or lead to other “Voice menus”
- The “Audio File” block can only be in one place, as the file that is played before the “Call Users” scenario in case the “No” branch of the “Working Hours” block applies. The only possible block order: Working Hours (No) – Audio File – Call Users.
Additional Virtual PBX features
With the setup assistant, you have completed the basic configuration of the PBX, but the best part of the PBX is that it offers other interesting features that you can adjust according to your needs. Below, we detail each of these features.
-
Call transfer.
- Direct transfer to an extension. To transfer the client’s call to another extension, press #, followed by the extension number, and then # again. For example, #101#.
- Transfer with voice notification. To transfer the call with a prior voice message, press * followed by the extension number, and then #. For example, *101#. With this, you can communicate with the marked extension before transferring the call. Once the initial extension hangs up, the client will be connected to the other extension. If the marked extension does not answer within 25 seconds, the client’s call will return to the initial extension.
- Pickup an incoming call. To answer an incoming call if your extension is not in the call scenario, simply dial 40 and press the call button.
- Transfer to a scenario (Department).To transfer the call to a specific scenario (department), press the scenario number, for example, #1#.
-
Number dialing format.
The dialing format and call forwarding are configured in the “Outgoing Calls – prefixes and codes” section of your personal area. By default, the number is dialed in local format (e.g., Madrid number in format 91…), based on the city indicated in the “Settings – My Profile – General Information” section.
You can also disable the “Call without country prefix” option in the “My Profile” section and dial the number in international format (country prefix, city, number).
In the PBX, you can select pre-configured dialing rules or set your own rules from the prefix settings section.
Country prefix – shows the country prefix used for outgoing calls from the virtual PBX, without prefixes or in local format.
City prefix – shows the city prefix added to the number when dialing without prefixes, in local format.
Prefix for international calls – prefix that, when dialed, is replaced by the country prefix plus the city prefix. For example:
Prefixes for calls to Spain:
- Country prefix: 34
- City prefix: 91 (Madrid)>
- Interprovincial prefix: 0
- International prefix: 00
To call Madrid (+34910640111), dial 0640111
To call the United States (12345678901), dial it in the format 0012345678901 or +12345678901.
-
Call recordings
You can activate call recording for one or multiple extensions. The recordings will be sent via email or stored in the cloud (on our server).
Call recording is free for up to 5 extensions (there is also the “Lite” package with 5 extensions and more storage, the “Office” package with 10 extensions, and the “Enterprise” package with 50 extensions). After that, the cost is €1 per month for each additional extension.
Cloud storage space is 200 MB for the “Standard” plan, 2000 MB for the “Lite” package, 4000 MB for the “Office” package, and 8000 MB for the “Enterprise” package (5000 MB of cloud storage equals more than 250 hours of recording).
You can listen to the recordings stored in the cloud in the “My PBX” section – “Statistics and Graphs” or download them through the API. When you disable call recording, the recordings are deleted from the cloud after 180 days.
To activate the call recording feature, go to the “My PBX” section – “Extensions“.
-
Megacall PBX Integration with CRM and other management systems.
You can integrate Megacall’s virtual PBX with one of the CRM systems or with Megacall’s own CRM (Megacall CRM) or other services.
The integration setup is done in the “Settings” – “Integrations and API” section. Currently, we offer free and official integrations with Zoho CRM, Hubspot, and Zapier.
-
Call forwarding configuration.
Call forwarding involves redirecting calls to another landline or mobile number. It’s useful for receiving calls without the need for additional programs, equipment, or an internet connection.
To ensure you never miss a call, you can activate conditional forwarding to your mobile or landline number.
To enable call forwarding, go to the “My PBX” – “Extensions” page. On the left side of the extension configuration, in the “Forwarding” field, choose the “No answer, unavailable” option to activate conditional forwarding, or the “Always” option for unconditional forwarding.
In the first case, the call will first enter through the internet to the connected program or equipment, and if disconnected or unanswered within 20 seconds, it will be forwarded.
When unconditional forwarding is activated, the call will always be sent to the forwarding number, regardless of whether there is an active program or equipment.
In the “Phone” field, enter the forwarding number using the dialing prefixes (if activated in “My PBX” – “Outgoing Calls”) without the “+”, and complete the “Phone” field to save the settings. If the “Call without country prefix” feature is activated, enter the number in local format.

Call forwarding can be configured using the following elements:
- To a number: Forward calls to another operator’s number in international format. The format can be modified using the “Call without country prefix” feature in “Settings – My Profile – General Settings – Calls” and the prefix settings in “My PBX – Outgoing Calls – Prefixes and Codes.”
A “Forwarding notification” is available. This message is played on the forwarded number before connecting to the client. This option is useful for distinguishing forwarded calls from direct calls to the number. - Voicemail: You can configure a greeting that will be played to the client before they leave a voicemail. You can either upload your own file (up to 5 MB) or insert text to be spoken by a robot.
- Forwarding to SIP: Forward calls to another extension within the same PBX or to the SIP of your account. You can use the “Forwarding notification” mentioned in the “To a Number” section.
- Voice Menu: Forward calls to a different menu or independent voice scenario within the same PBX.
For each extension, you can configure a different working schedule using the “Separate for working hours/non-working hours” option. By activating this, you can set working hours by days of the week and times, as well as apply a holiday calendar.
If Megacall CRM is connected, you can synchronize the extension’s working hours with the user schedule in Megacall CRM associated with that extension.
For non-working hours, a different forwarding option can be set, such as forwarding calls to a different number or having them received by another employee.
Additionally, if the feature “Allow forwarding configuration from the Android/iOS app” is enabled, the user can modify the forwarding number from the Megacall mobile app.
-
Voicemail feature.
The voicemail feature allows you to record voice messages when you’re unable to answer a call.
To enable voicemail, enter your email address in the forwarding settings. Keep in mind that it’s not recommended to use voicemail in the same sequence as other extensions, as the voicemail will be the first to “answer” the call.
To notify the client, you can either upload an audio file, insert text for the robot to read, or choose the standard notification.
-
Third-party messaging app notifications.
You can receive notifications about missed calls, balance updates, extension numbers, rates, and SMS messages through popular messaging apps like Telegram, Facebook Messenger, Viber, or Slack.
To configure these notifications, go to your personal area under Settings – My Profile – Notifications.
-
Conferences.
During a call, users of the virtual switchboard can use the command 000 to create a conference.
After entering 000, you need to input the phone number of participant C, followed by confirming with the # button, for example, 000102#.
At the moment the number is entered, user B will hear music, and users A and C will be able to talk to each other:
- Press # to confirm the inclusion of user C (during the conversation with them).
- Press * to cancel user C and return to the call with user B or the conference.
- Press *# to return to user B or the conference.
Once participant C has been added, you can dial 000 again and add another user, while the call between the others continues. Once created, the conference will remain active as long as there is more than one user in it.
Participant C can be any number (the phone number format should be like a normal call, for example, 000911232111#).
-
Determination of number based on call destination (CallerID).
CallerID refers to the number displayed on outgoing calls.
With CallerID, you can set any connected or confirmed phone number from the virtual switchboard. It’s possible to use different CallerIDs for calls from different devices, or to specific destinations (country or city).
To enable the “Determination of number based on call direction” option, go to the “My switchboard” – “Outgoing calls” page and, on the right side, click on “Add rule for number determination”. Then, enter the country and/or city prefix for the calls.
Example: 34 for Spain, 44 for the United Kingdom, etc. Select the desired CallerID and click the “Create” button.
-
External lines.
You can connect up to 20 numbers from another operator to the Megacall virtual switchboard from the “My Switchboard” – “External Lines” page.
If you have a landline number connected via the copper line, you need to use a gateway with an FXO port and activate the external line in “Gateway” mode in the Megacall personal area, where you’ll enter the settings from the website.
If your number works based on the SIP protocol, simply activate the external line in “Server” mode and create the number settings.
Your operator will need to provide the connection data, which are: server, domain (which may be the same as the server), username, and password.
On our end, the connection to the number is made from the following IP addresses:
185.45.152.167
185.45.152.184
185.45.152.185
195.122.19.26
195.122.19.16
37.139.38.70
37.139.38.71
185.45.155.13
185.45.155.27
You can also port (transfer) a number from another operator to our services. This allows you to keep your existing number while benefiting from the features and flexibility of the Megacall’s PBX.
-
PBX statistics.
You can obtain detailed call statistics in the virtual switchboard from the “My PBX” section – “Statistics and Graphs.” Here, you can select the period, compare multiple periods, view the overall graph, and see the call geography.
The statistics and graphs are available for all calls, including different virtual numbers and external lines.