Call Tracking Megacall – Setup Instructions

What can you do with Megacall's call tracking?
Call tracking is a very useful tool for businesses, as it allows you to track, analyze, and also optimize phone calls.
- It provides detailed information about the visitors to your website who have called you. You can analyze their behavior before contact, such as navigation depth, number of visits, traffic sources, and much more. It also helps you identify which countries your customers are calling from and the percentage of calls that meet your goals.
- Tracking advertising sources, such as contextual ads, banners, and paid posts, allows you to monitor and compare the performance of your advertising channels. For example, if you use platforms like Google and Bing, you can analyze the number of visitors, calls, and conversions from each campaign. You’ll also be able to compare the effectiveness of these paid campaigns with organic traffic from the same search engines, direct visits to your site, and more.
- Call tracking also enables you to track offline advertising, such as billboards, newspapers, flyers, radio, or TV. You can assign a specific number and budget to each advertising source. This way, the system will show you the effectiveness of each source and the cost per call, allowing you to more efficiently redistribute your advertising budget.
Advantages of Megacall's call tracking
- The call tracking feature is free; you only pay the monthly fee for the virtual numbers you’ve subscribed to, which remains the same even if you don’t use the call tracking tool.
- You can integrate the call tracking function with Google Analytics and Bing.
- Setup is easy, and the statistics are practical and accessible.
Call Tracking Setup
Log in to your Megacall personal account and go to the section Services – Call Tracking. If you have multiple projects, you can add a different tracker for each one with custom settings and individual statistics.
- Data collection: recommended for gathering data about each website visitor, understanding your customer, identifying which countries they’re contacting you from, which UTM tags are transferred, etc.
- Online advertising: when the advertising sources are known and you want to measure their effectiveness.
- Offline advertising: to track the effectiveness of offline advertising with easy tracker setup.
DATA COLLECTION
General parameter settings are already in place, but you can modify them if needed:
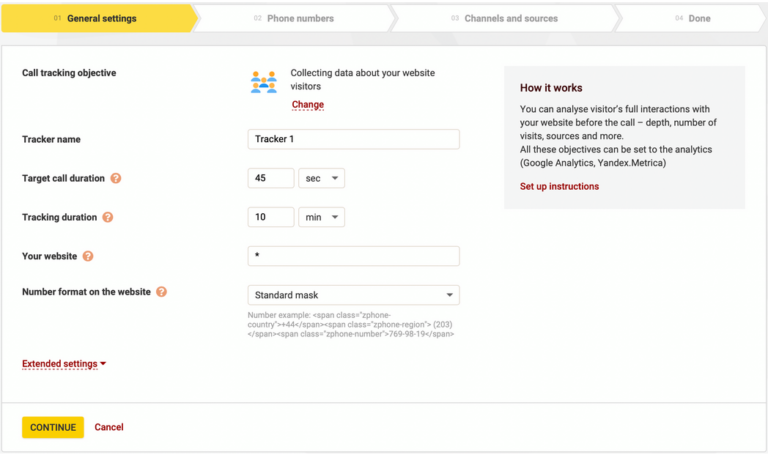
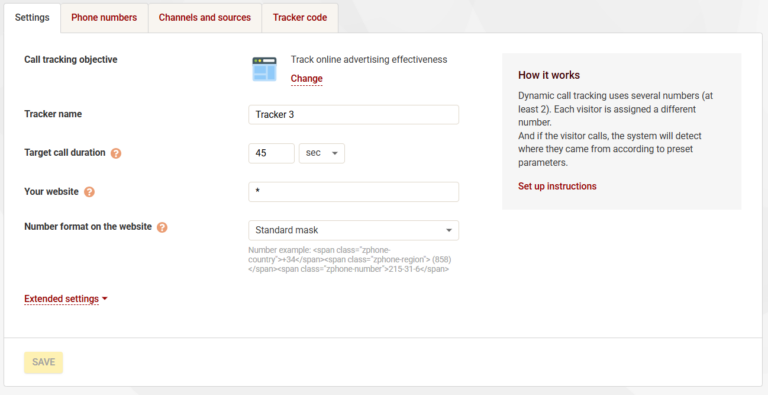
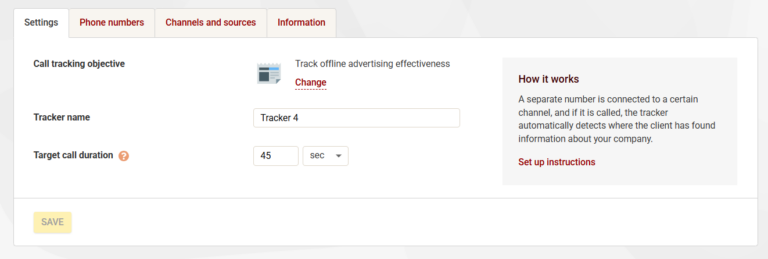
- Tracker name: only displayed in the personal area of the platform.
- Target call duration: indicates that calls lasting longer than the specified duration are considered as goal conversions.
- Tracking duration: the average time a visitor stays on the website. It defines how long a specific number is assigned to a visitor during dynamic call tracking.
- Website: the tracker code will work by default on the websites where it is placed. You can specify on which domains it should work by entering the address in the format site.com or multiple domains separated by commas. If you want the tracker to work on a domain and all its subdomains, you can add “” or “.” so that it works only on subdomains.
- Number format on the website: the format of the number displayed on the site. You can choose from predefined masks or create a custom one. The 'X' symbols in the mask will be replaced by the digits of the number. In addition to parentheses and spaces, you can use special symbols such as % for the country prefix, | to trim blocks, and ~ to close a span tag. If you choose the standard mask, the number will be split into three span elements with unique CSS classes, allowing you to style the country prefix, area code, or main number separately.
Extended seetings.
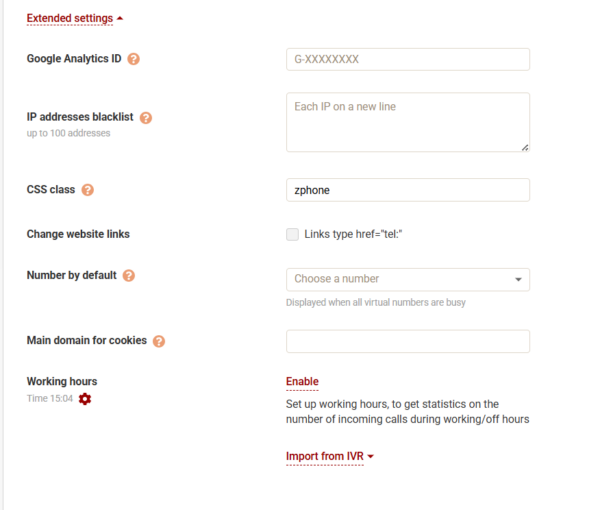
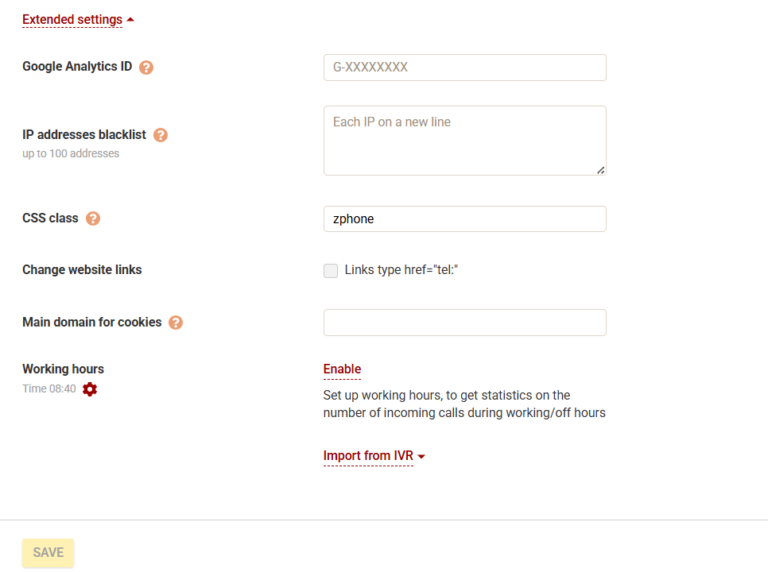
- Google Analytics ID: used to transfer the ClientID of the website visitor who made the call and to report the call in analytics services when using dynamic call tracking.
- IP addresses blacklist: for users accessing from these addresses, call tracking will not modify the displayed numbers. You can add up to 100 IP addresses by entering each on a separate line.
- CSS class: by default, the tracker will replace the number in website elements assigned the class zphone. Example: 34910606111If you prefer to use your own CSS class, specify it in this field. You can list multiple classes separated by spaces, and the tracker will replace numbers in elements containing any of those classes.
- Number by default: the number displayed when all dynamic numbers are in use and a specific number hasn’t been assigned to the corresponding source.
- Main domain for cookies: if the tracker is used across multiple subdomains, by default each will generate its own cookies. This means the source identification and number replacement will be repeated on each subdomain. To use cookies across all subdomains, enter the main domain in this field.
- Working hours: used to differentiate between calls received during or outside of working hours. You can transfer the schedule previously set in the IVR menu of the virtual PBX by selecting it and clicking “Save.”
Once all the settings are configured, click “Continue.”
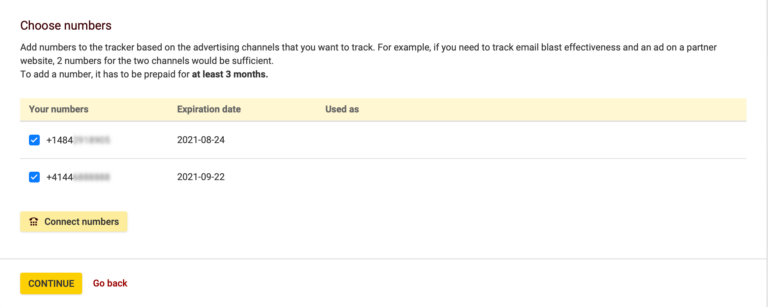
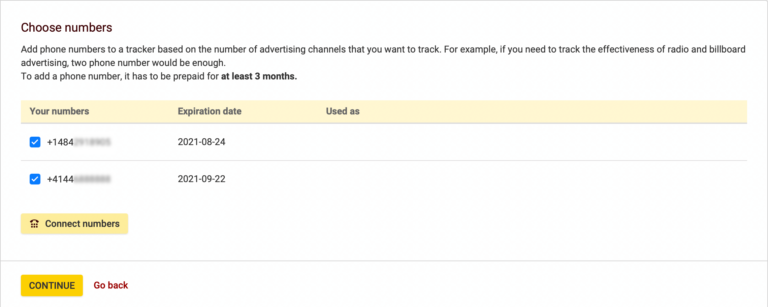
On the next page, “Phone Numbers,” you need to add the numbers to the tracker.
The number of dynamic phone numbers required should match the number of simultaneous visitors during peak traffic hours. Each visitor is assigned a unique phone number, which allows precise identification of the ClientID of the user making the call.
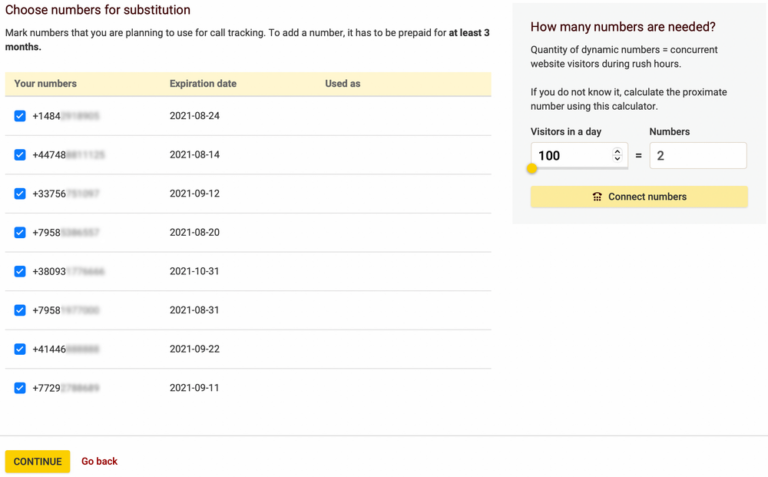
Select the numbers and then click Continue.
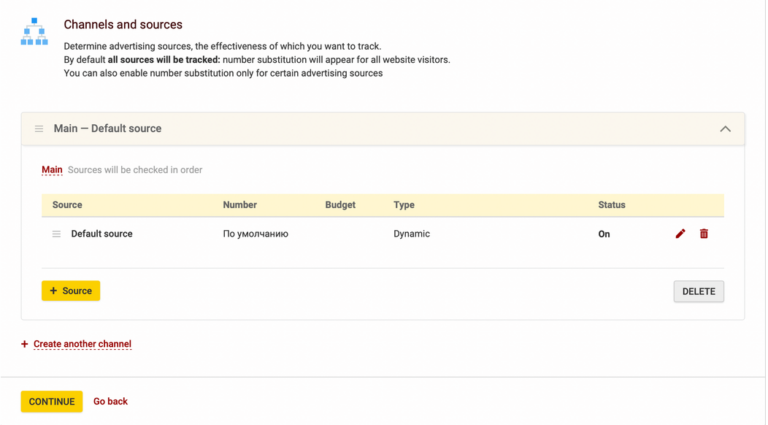
In the “Channels and Sources” section, all sources are tracked by default, applying number replacement to all website visitors.
You can also configure number replacement only for specific advertising sources. More details below:
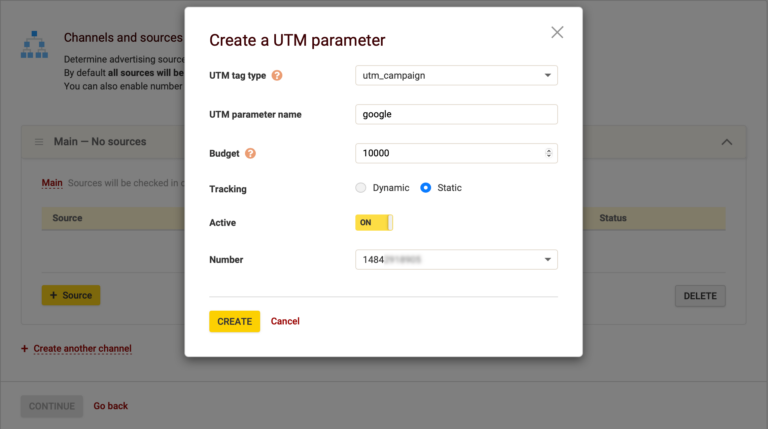
UTM. UTM tag tracking. Example: contextual advertising, email campaigns, ads, etc.
- utm_source – For advertising platforms. Example: Bing Ads, Google Ads (utm_source=bing, utm_source=google).
- utm_medium – For traffic types. Example: cpm, cpc, email (utm_medium=cpm, utm_medium=cpc, utm_medium=email).
- utm_campaign – For marketing campaigns. Example: bicycle (utm_campaign=bicycle).
- utm_content – For different ad versions. Examples: two different URLs in the same promotional email (utm_content=join_us_link or utm_content=see_all_items_button).
- UTM name – Indicates the name of the UTM tag set in contextual advertising, email campaigns, etc. Multiple values can be entered, separated by commas.
Organic search. Tracks visits to your website coming from search engines like Google and Bing, and replaces the number in these cases.
Transit from another website. Traffic arriving at your site via a link from an external site that is not a search engine (for example, a banner or ad on a partner site). In the "Domain name" field, you must enter the referring website’s address to track the visit and apply number replacement.
Direct hit. Visits to your website from bookmarks or direct links.
By country. Tracks traffic coming from different countries. For example, to replace the tracker's number with the one corresponding to the visitor’s country.
If you want the number replacement to apply to all users, simply click the “Continue” button. This will complete the tracker setup successfully.
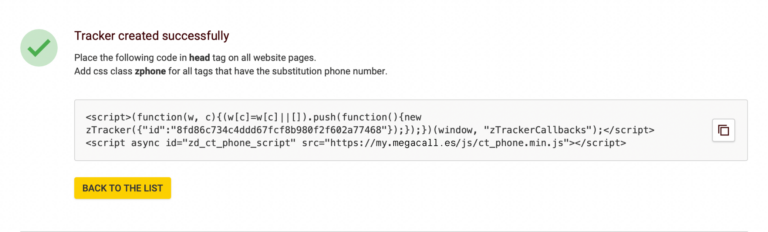
Place the code that appears in the head tag on all pages of your website.

Add the CSS class “zphone” to all tags displaying the phone number so it can be replaced. If you set a custom CSS class in step 1, use that instead.
<div class="zphone">34910607112</div>
To make the phone number clickable on the website, you need to assign the zphone class to the link tag (<a>). Example:
<a href="34910606111" class="zphone">34910606111</a>
The tracker setup is now complete.
ONLINE ADVERTISING
For Online Advertising, the first sections “Settings” and “Extended Settings” largely share the same fields as the first objective, Information Collection, offering a similar structure for configuring the parameters. The only difference is that in Online Advertising, the fields related to “Tracking Duration,” and “Default Number” are not present. Therefore, the procedure remains the same.
Once all settings are configured, click “Continue.”
In the “Phone Numbers” tab, you must add the numbers to the tracker.
Add the required number of phone numbers to the tracker based on the advertising sources you want to track. For example, if you want to measure the effectiveness of an email campaign and an ad on a partner website, you will need two numbers—one for each source. If you choose dynamic call tracking, the number of phone numbers must match the number of simultaneous visitors during peak traffic hours. This allows a unique number to be assigned to each visitor in real time, ensuring accurate identification of the ClientID of the caller. Once the numbers are selected, click “Continue” to complete the setup.
In the “Channels and Sources” tab, it is essential to specify the advertising sources whose effectiveness you want to analyze. For visitors who arrive at the website through these sources, number replacement will be applied.
The types of advertising sources are the same as those for the Data Collection tracker, with one additional option here:
Default source – Assigned to any visitor of the website. In the “Information Collection” tracker, this source is generated automatically and can be used to ensure that number replacement is applied to all users. It is recommended to place it at the end of the source list and assign it the lowest priority to avoid interference with more specific configurations.
The parameters for the sources are:
- Name. The name of the source where the advertisement is displayed.
- Budget. Monthly spend for the source, allowing you to track conversion costs in the statistics.
- Tracking. Choose between dynamic or static tracking.
- Default number. This number will be shown to visitors when the number of simultaneous users on the website exceeds the amount of dynamic numbers in the tracker. This way, those who cannot be assigned a unique number will see the assigned default number.
- Number. Available if you select static tracking; this is the number that will be shown to website visitors coming from the specified source.
- Activity. Displays whether the source is active or inactive.
All sources are created in the main channel by default. You can modify the name, and if there are multiple sources of the same type, you can group them by creating a separate channel.
You must add at least one source and then click Continue.
With this final step, the tracker has been successfully created.
Now, you must place the code in the head tag on all pages of the website.
Add the CSS class zphone to all tags that display the phone number to be replaced. If you configured a custom class in step 1, use that instead.
Example:
<div class="zphone">34910607112</div>
To make the phone number clickable on the website, you must assign the zphone class to the link:
<a href="34910607112" class="zphone">34910607112</a>
With this, the tracker setup is complete.
OFFLINE ADVERTISING
- Tracker name: the name will only be visible in the personal area of the platform.
- Target call duration: calls longer than the indicated duration will be considered as target calls.
Click the “Continue” button.
On the next page, “Phone numbers”, add the numbers to the tracker.
Add as many numbers as needed to the tracker based on the advertising sources you want to track. For example, if you want to measure the impact of an email campaign and an ad on a partner site, you’ll need two numbers, one for each source. Once selected, click “Continue”.
In the “Channels and Sources” section, you must specify the advertising sources whose effectiveness you want to monitor.
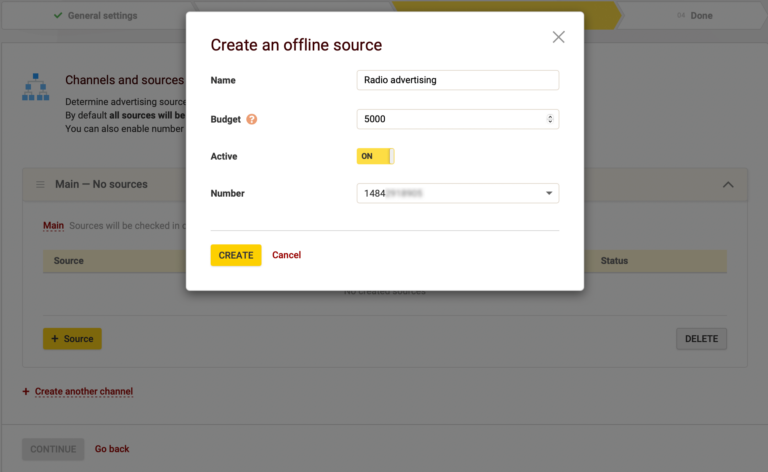
Name: Name for the source where the advertisement appears.
Budget: The monthly spending of the source, used to calculate the conversion cost in the tracker statistics.
Number: Indicate the number to which calls from the advertising source will be assigned.
Click “Continue” and the tracker setup will be complete.
To make the most of the call tracking feature, we recommend using Megacall’s free virtual PBX, as it will help distribute calls among your employees and take advantage of other useful services for your business. You can check the virtual PBX configuration here.
You can also receive call details for numbers linked to call tracking, along with the caller’s ClientID, via CALL_TRACKING webhook notifications.