Megacall CRM – Setup manual

A CRM is a tool designed to manage customer interactions, helping to improve contact organization and sales opportunity tracking. Megacall CRM is fully integrated with the virtual PBX, manage calls with the help of the built-in web phone, view customer histories and data from a single place, and control all your business management with Megacall CRM.
CRM wizard
If you have created and activated the virtual PBX in the Megacall personal area, go to the Services - CRM section. Then, click on "Activate Integration" and afterwards on "Go to CRM Account."
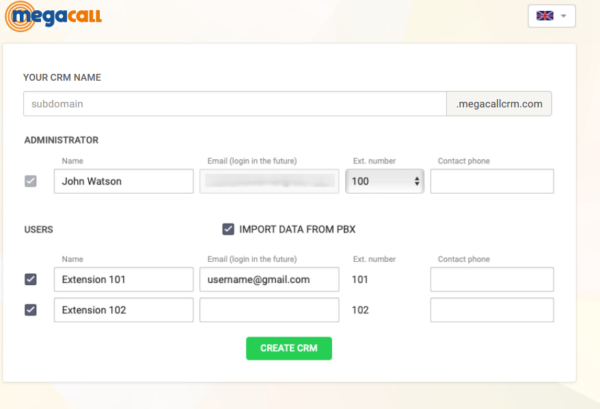
If you haven’t created the virtual PBX yet, use the PBX setup assistant and select the specific option in the first step. During the CRM creation stage, enter the CRM name using Latin characters and choose the extension for the administrator account. You can create other users on this page, or you will always have the option to add them later. Finally, click on "Create CRM."
Dashboard Megacall CRM
In this page, you can find widgets with useful information about the current CRM tasks. The widgets can be moved around the page and arranged in the most convenient way for each user. They can also be set to hidden or visible mode.
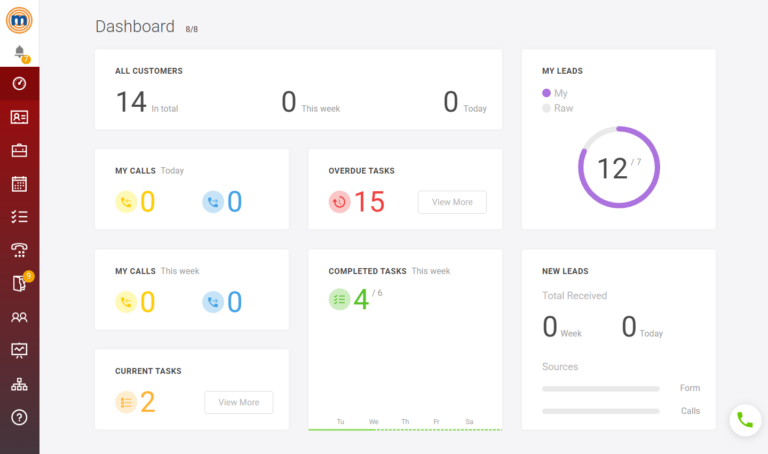
List of widgets on the dashboard:
- Customers: Displays the total number of clients, the number of new clients this week, and today.
- My leads: Shows the number of leads managed by the agent and the number of unprocessed leads pending attention.
- Completed tasks: Indicates the number of tasks completed this week compared to the total number of tasks.
- Overdue tasks: Displays the number of tasks assigned to the agent that were not completed within the scheduled time.
- Current tasks: Provides information on the number of active tasks.
- My calls: Shows the number of incoming and outgoing calls today and this week.
- New leads: Displays the number of new leads generated today and this week.
Customers

You can filter the client search using the panel on the left side, which can also be hidden by clicking the arrow. You can also use the universal search field located at the top of the page.
On the right side, you will find the "+" button to add a new client. The "•••" button allows you to import or export a client database.
- Add a new task: In the client profile, you can add tasks by clicking the "•••" button and selecting "Create Task."
- "My clients" view: There is a separate tab called "My Clients" where you can see the clients assigned to you. The "All Clients" view displays the full list of clients added to the CRM.
- Tags: You can use tags to group similar clients and make searching easier.
- Additional settings: If the default fields are not sufficient when editing contact details, you can add custom fields in "Additional Settings."
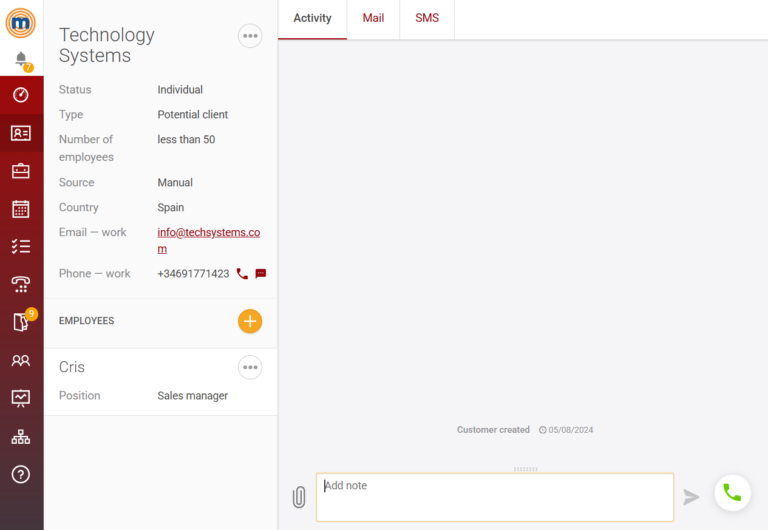
In the client profile, on the left side, you can see the client's details (status, type, email, phone number, etc.). With just one click, you can send an email, make a call, or send an SMS. The "•••" menu provides options to edit client details, create agreements, tasks, and video conferences.
On the right side, you will find the client’s profile, where all related events will be displayed: calls, notes, tasks, call recordings, agreements, email history, SMS, etc.
If you select multiple clients at once from the main client section, the "•••" menu will offer the following options:
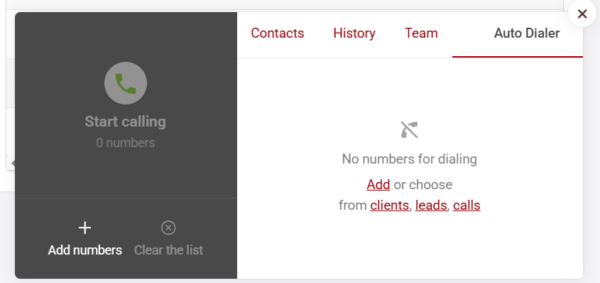
Add to auto dialer list
You can call a selected list of numbers using the web phone. The system will automatically dial the numbers, starting with the first one. If the call is unanswered or disconnected, the next call will begin after 5 seconds. The auto dialer can be paused or restarted at any time.
To create an auto dial list: From the Leads and Clients section, select the client list and add it to the auto dialer list. Alternatively, open the web phone and select the Auto Dialer section.
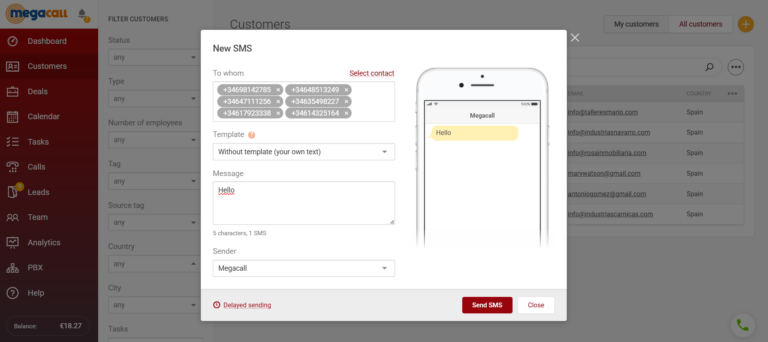
Send SMS
With the selected clients, you can send SMS by choosing a template or manually entering the text. Once sent, you will see the delivery report after the message is sent.
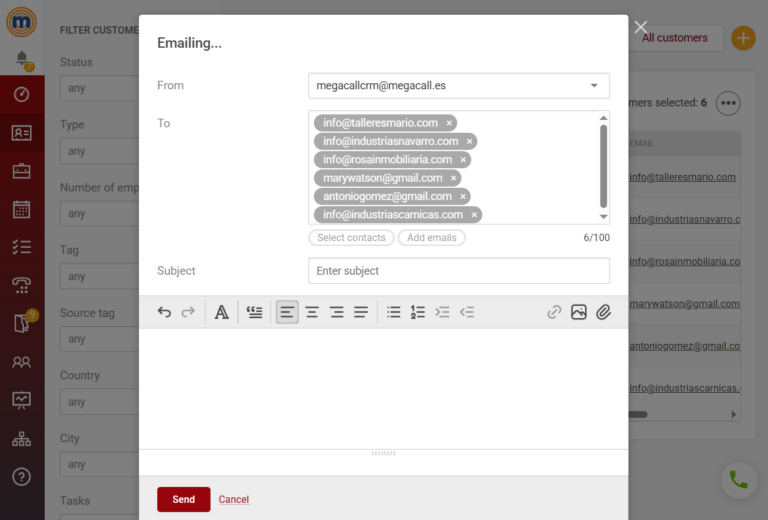
Emails campaigns
To send an email (mailing) to selected clients, simply enter the subject and email text, select the signature template, and click “Send”. Recipients can be added or removed as needed.
Client import
It is entirely possible to import a client list into Megacall CRM from any other CRM. From the Clients section, click "•••" and select "Import". You will need to upload a .csv or Excel file.
Phone numbers in the file must be in international format if the clients are from different countries. Numbers should be prefixed with “+”, and the cell format should be set to text.
In the Import window, the left side displays the field names from the file, while the right side shows the corresponding values in the CRM. For example, if the file has a column named "name", you should assign it to "Name", and if there is a column named "number", you should map it to "Phone", etc.
If the client has multiple phone numbers, they should be listed in the same cell, separated by commas, to ensure all numbers are transferred correctly to the CRM. To cancel the import, you can do so by clicking "•••" and selecting the "Cancel Import" option.
Deals
In the “Deals” section, you can work with either a Kanban view or a list view.
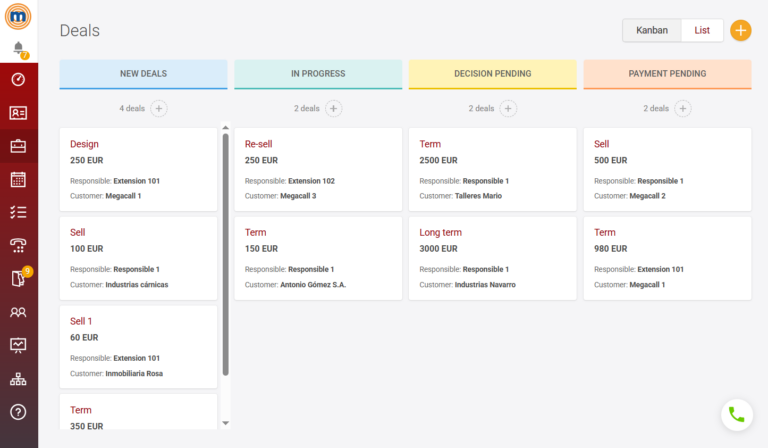
A deal can have different status:
- New deals.
- In progress: Communication with the client.
- Decision pending: Waiting for a decision from the client.
- Payment pending: Work completed, awaiting payment.
- Deal successful: Final state.
- Deal canceled.
Deals are always linked to a client. As a result, a client can have multiple deals assigned, either in the same or different currencies. The sales funnel for deals can be viewed in the Analytics section.
Each deal has its own activity history.
Calendar
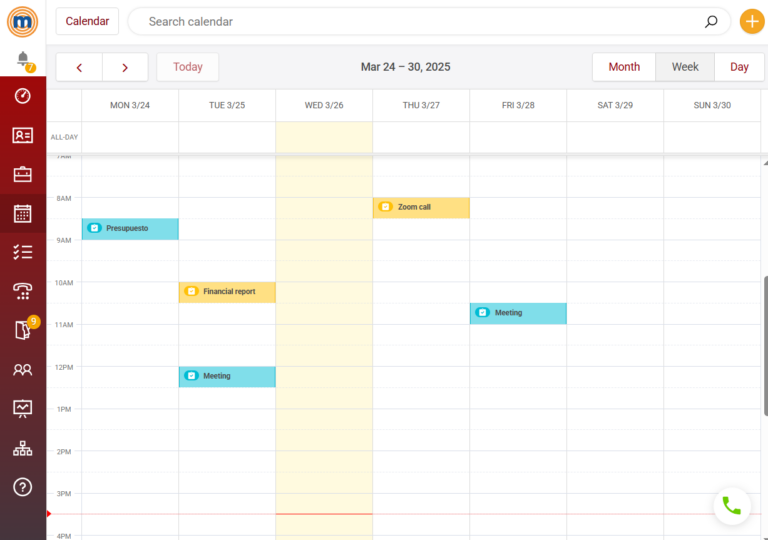
Calendar section, you can view all tasks, and if you are an Administrator, you can also see the tasks of all agents. You can create your own tasks, as well as tasks for other CRM agents.
From the Megacall CRM calendar, you can also activate the two-way synchronization of tasks with Google Calendar:
- Add events in Megacall CRM, and they will automatically be added to the Google Calendar of each participant.
- Add events in Google Calendar to create tasks in Megacall CRM.
- Modify events in Megacall CRM from Google Calendar and vice versa.
- Synchronize the deletion of events from both calendars.
Tasks
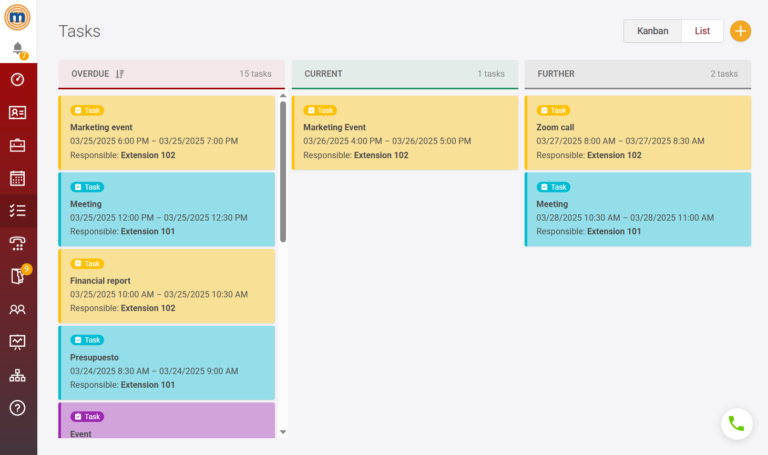
The block with filters in the Tasks section will help you find the task you're looking for. You can mark a task as completed by using the checkbox and clicking on Finish, and you can also find any task that is already closed or outdated.
Types of tasks:
- Task: A standard type where you can add the client or colleagues for joint work.
- Call: Ideal for important calls planned with a client.
- Video conference: Organize video conferences with colleagues.
- SMS: Postpone sending an SMS reminder to a client.
Calls
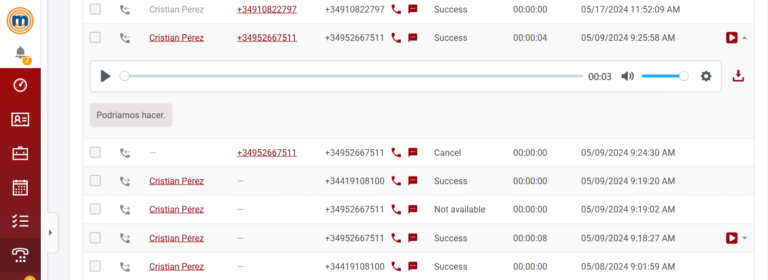
In the calls section, you will find a detailed list of calls. From here, you can listen to the recording or read the conversation transcript if the Voice Recognition feature is activated.
Call widget.
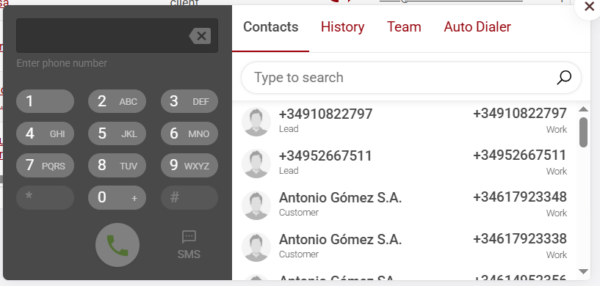
The call widget icon is located in the bottom right corner of the page.
Within the widget, on the left side, we can see the keypad to enter the number, the call button, and the SMS button. On the right side, there are tabs for Contacts, Call history, Team (colleagues), and Auto dialer.
Important! On the first call, it is essential to allow microphone access in the browser’s popup window to ensure everything works correctly.
If an incoming call comes from an unknown number, it can later be added as a client or lead by entering their name. A client profile will be created, where notes can be added during the call.
It’s worth mentioning that, during a call, you can transfer the call to another employee by clicking the two-phone icon.
Leads
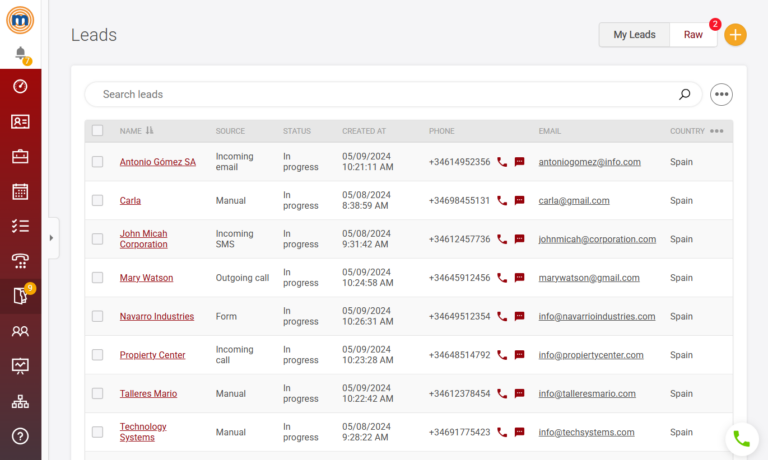
We refer to a Lead when we make the first contact with a potential client.
In the Leads section, you can see the list of leads on the right side, which can be classified as "My Leads" or "Raw". The Raw Leads are those that do not have an assigned owner yet. All CRM users can assign themselves leads in the Raw section.
If you add a lead by clicking the "+" button, the person who created the lead will automatically be assigned as the responsible party. If the lead is added from the Raw section, its default status will be "Raw".
Ways to obtain new leads:
- Manually, using the "+" button or during a call on the web phone.
- Import from a file via the "•••" menu.
- From a call or SMS: If the number is not already saved in Megacall CRM, it will create a lead. (Settings - Telephony)
- Leads from new emails (received or sent). (Settings - Email)
- Get leads with free integrations such as the Zapier platform, which also allows integrating Megacall CRM with over 4000 systems.
- Create a lead with an API. For example, you can set up the integration between Megacall CRM and your website and create leads through a web form.
Team
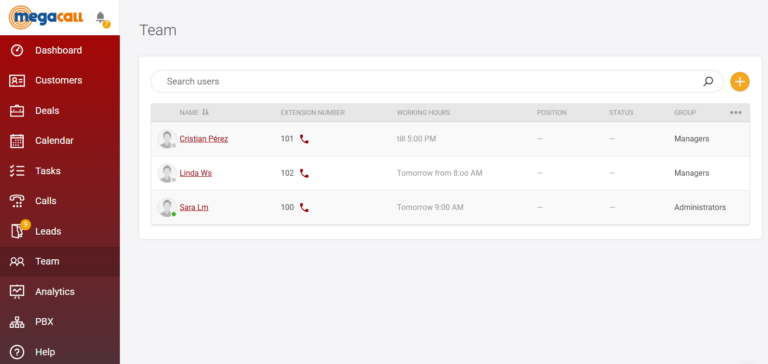
In this section, you will find the list of all CRM users, including their contact details, position, extension, and other relevant information. You can make calls to your colleagues by clicking the phone icon.
If you are an administrator, you can add new CRM users and edit the accounts of existing users. The button to add a new user is located in the top right corner of the page.
To add a new user, enter their username, email address, and assign an extension from the virtual switchboard before clicking "Add User." In the "Share invite" tab, you can invite multiple users by entering their email addresses. Additionally, in the "Generate Link" tab, you can create an invitation link and share it through messaging apps or social media.
Analytics
In the Analytics section, we can view analysis and results for: deals, calls, sources, leads, clients, tasks, and team.
Deals
Graphs will show the number of deals, profitability indicators, and a sales funnel. You can select the period you want to view in the analytics, where you will get data on conversion and the average time of deals.
Calls
Here, you can filter by user and time. This allows you to see who in the CRM is the most active in calls and analyze the number and duration of calls.
Sources
You can observe how efficient your sources were. For example, if a call is received, a lead is automatically generated, and Megacall CRM creates a source label for the number in the analytics, allowing you to track how many new clients, leads, and deals you have acquired, and how effective the advertising with the number is.
Labels can be created automatically or via API. With Megacall's Call tracking, UTM tags are automatically transferred to Megacall CRM and will be linked to the lead generated as a source label.
For example, if you receive a call from a new number, the CRM will automatically generate a lead that shows the UTM tags from the advertising campaign, and the lead profile will include the call recording.
Leads
Here, you will see a graph of unassigned leads and a pie chart of lead generation sources. With these analytics, we can extract data on how many leads were generated or how many were converted into potential clients.
Clients
You will be able to see the increase in clients over specific periods, or clients from the entire CRM or separated by each user.
Tasks
This gives you an analysis of tasks; how many tasks are open for each user and how many have been completed
Team
An analysis of team productivity by parameters: agreements in progress, successful agreements, tasks, and calls. You will also be able to see the total of each parameter.
Settings
Here, you will find all the settings that can be adjusted in Megacall CRM
- Profile
In the Profile section, you can select the platform language, upload a photo, provide contact information that your colleagues will see, and specify the corresponding extension from the virtual switchboard, the extension used for incoming and outgoing calls.
- Calendar
Here, you can configure task synchronization with Google Calendar.
To do so, click the Activate Google Calendar button and sign in to your Google account. Afterward, you need to allow access to Megacall CRM.
If you're looking to sync already scheduled events and tasks, you should select the following options:
- Add future events from Megacall CRM to Google Calendar.
- Add future events from Google Calendar to Megacall CRM.
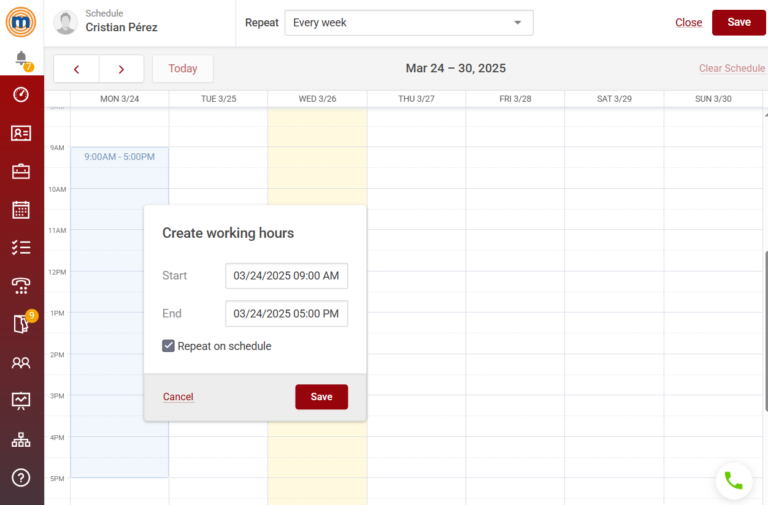
Working hours.
Indicate your time zone and the start day of the week, which will be Monday by default. By clicking the "set" button, you can set up your working hours.
First option: 5 days a week.
If you work from Monday to Friday, for example from 9:00 AM to 5:00 PM, place yourself in the "Mon" column at 9:00 AM and drag the cursor down until 5:00 PM. Repeat this action for the rest of the days and click Save.
Second option: "Day - Night - 48"
This would be an example where a user works on Monday during the day, so we select the schedule for Monday from 8:00 AM to 8:00 PM. On Tuesday, they work the night shift (from Tuesday to Wednesday), so we select the schedule for Tuesday from 8:00 PM to 12:00 AM and Wednesday from 12:00 AM to 8:00 AM. The schedule frequency can be configured with the option to repeat every 4 days.
- Telephony.
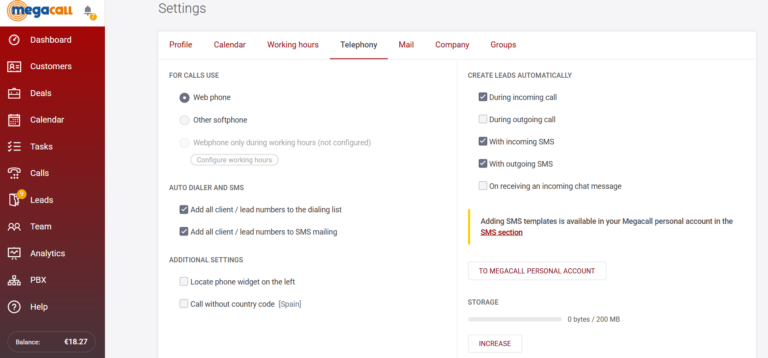
In this section, we can configure the widget for calls, which can function in three different modes:
- Webphone: The call is made directly from the browser. Important! On the first call, a pop-up window will appear, and it is essential to allow microphone access for it to work.
- External Softphone: Calls can be made using an IP phone or softphone configured in the virtual switchboard extension. When a call comes in, it will be directed to the switchboard extension, and once answered, it will be routed to the client's number in the CRM. Information about the call will be displayed in the widget.
- Webphone during work hours: The webphone will ring only during your working hours.
In this section, we can also see the options for automatic lead generation for incoming or outgoing calls. If a call comes from a new number, a lead will be generated automatically, as will be the case for an outgoing call to a number not saved in the CRM.
Automatic lead generation can also be configured for SMS.
Additionally, there is the option to “Call without country code,” which will allow you to make calls in a local format. If this option is disabled, you will need to dial the number in international format.
Now, let's talk about the automatic dialer and SMS options in this section. A single client may have several phone numbers, and when adding the client to a call list or sending SMS, all of their numbers will be included. If this option is disabled, only the first phone number in the client’s record will be added.
Mailing

In Megacall CRM, you can send and receive emails through integrations with the most popular email services.
To set this up, click “Add Email” and select one of the services or your IMAP settings.
Important! If two-factor authentication is disabled, you'll need to enable it first. Once it's activated, go to the "App Passwords" section and create a new password. You can assign a name to it, like "Megacall CRM," and then click "Create." This will generate a specific password that you will use for linking Megacall CRM with Gmail. It's important to keep this password secure, as it allows the integration to function properly.
You can send emails to up to 100 users at the same time. You can either use the email integration yourself or grant access to other CRM users. The limit for email integrations is 20.
Automatic lead generation based on new emails is also available. When a new email is received, you will see a pop-up notification. New email checks are done every 10 minutes.
You will also find sections such as:
Signatures: With templates for email signatures for emails sent from the CRM.
Exceptions: Any emails from the specified senders will not be added to Megacall CRM.
- Company.
In this section, you can find settings for the company name and currency. You can select additional currencies besides the default one, for example, if your company makes agreements with other countries using different currencies.
- Groups.
Here, you can configure permission rights for standard user groups or create custom groups with specific rights. The administrator can assign a user to a group from the "Team" section.